How to configure Pidgin to work with Google Talk
Pidgin is an instant messaging program for Windows, Linux, BSD, and other Unixes. You can talk to your friends using AIM, ICQ, Jabber/XMPP, MSN Messenger, Yahoo!, Bonjour, Gadu-Gadu, IRC, Novell GroupWise Messenger, QQ, Lotus Sametime, SILC, SIMPLE, MySpaceIM, and Zephyr.
Pidgin can log in to multiple accounts on multiple IM networks simultaneously. This means that you can be chatting with friends on AIM, talking to a friend on Yahoo Messenger, and sitting in an IRC channel all at the same time.
Pidgin supports many features of the various networks, such as file transfer, away messages, and typing notification. It also goes beyond that and provides many unique features. A few popular features are Buddy Pounces, which give the ability to notify you, send a message, play a sound, or run a program when a specific buddy goes away, signs online, or returns from idle; and plugins, consisting of text replacement, a buddy ticker, extended message notification, iconify on away, spell checking, tabbed conversations, and more.
HOW TO CONFIGURE PIDGIN WITH GTALK :
1- Get Pidgin and Install it on your computer.2- Select 'Accounts' -> 'Manage' -> 'Add'
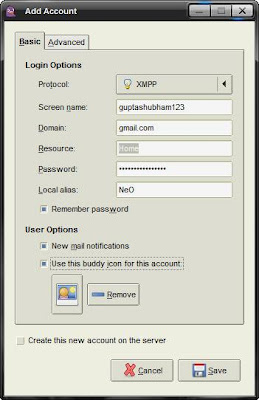
This will open a new window- “Add Account”
3- From the drop down box choose XMPP as the Protocol.
4- In case of Screen name enter your Gmail Id (e.g. - guptashubham123).
5- Type gmail.com as the Domain/Server.
6- In Resource Field enter Home.
7- Type your Gmail Password in the Password Field.
8- Choose any Nickname (e.g. - NeO) as Local alias.

That’s it you are almost then.
Now, if you are behind a proxy server that is blocking Pidgin to connect to Internet and to log in your account, just follow the below mentioned steps. I am sure you’ll be able to run Pidgin freely like I do.
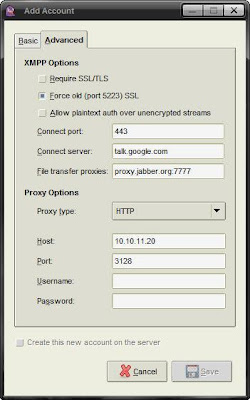
Click on the “Advanced” tab in Add/Modify Account window and do the following:
1- Force old (port 5223) SSL: Checked
2- Allow plaintext auth over unencrypted streams: Un-Checked
3- Connect Port: 443
4- Connect Server: talk.google.com
5- Proxy Type: Choose your protocol and enter desired proxy settings. In my case it’s HTTP, Host: 10.10.11.20 and Port: 3128. If you don’t know about this, select Proxy Type as “Use Global Proxy Settings”.

You are done. Now, you can use Pidgin as much as you like.


 TechQuark is a mobile-friendly website. Simply bookmark