Open CV Installation in Linux with ffmpeg Function Enabled
 Open CV (Open Source Computer Vision) is a open source computer vision library developed by Intel. Many people have encountered problems installing Open CV in a way that it works properly with videos. The primary reason for it is missing header files. Generally, people install ffmpeg but do not have header files in their system. There can be various issues for problems of Open CV with videos.
This article tells every step from start to install Open CV so that it works with ffmpeg.
NOTE : It has been assumed that, none ffmpeg, nor open CV is installed in Linux
STEPS :
To install open CV with ffmpeg in linux, follow these steps
1. Install ffmpeg.
Go to Synaptic package manager and search for ffmpeg. Mark it for installation and apply. On many different sites, I have found them telling about the way to install ffmpeg from terminal, which is tedious. However, the configuration of ffmpeg when you install it from synaptic package manager is :
--enable-gpl --enable-postproc --enable-swscale --enable-x11grab --extra-version=svn17737+3:0.svn20090303-1ubuntu6 --prefix=/usr --enable-avfilter --enable-avfilter-lavf --enable-libgsm --enable-libschroedinger --enable-libspeex --enable-libtheora --enable-libvorbis --enable-pthreads --disable-stripping --disable-vhook --enable-libdc1394 --disable-armv5te --disable-armv6 --disable-armv6t2 --disable-armvfp --disable-neon --disable-altivec --disable-vis --enable-shared --disable-staticThis configuration is required, so that ffmpeg can be used with open cv.
2. Download Header Files
In the Synaptic package manager, search for the following packages and install all of them
libswscale-devAfter doing so, go to /usr/include and check for separate directory for each of the libs and all the directories contain some header files.
libavcodec-dev
libavformat-dev
libavutil-dev
3. Install gtk+2.0
From the Synaptic Package Manager, search for gtk+2.0 or gtk2.0 . Install it.
Till now, all the pre-requisites to install open cv has been met.
4. Run OpenCV
After navigating to OpenCV folder, in terminal write :
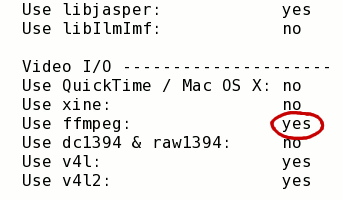
./configureDuring the configure process, it checks the presence of several header files. After it has completed configuration, check that use ffmpeg is marked as yes (see figure below). It will be visible in the terminal itself. In case it is marked no, scroll up and check if the presence of above directories are found or not.
 In case the use ffmpeg is yes, everything is fine. Now write the following commands on terminal. Once they are done, openCV is successfully installed and can be used with videos.
makeIn case use ffmpeg is no, there is some problem with ffmpeg. Check for the directories as previously told. Also look out if gtk+2.0 is installed.
sudo make install
YOU ARE DONE, IF YOU ARE READING THIS STATEMENT.
To run a program from terminal the command is :
g++ -I/usr/local/include/opencv -lcxcore -lhighgui -lm fileName.cppHowever you can also use
alias gcv="g++ -I/usr/local/include/opencv -lcxcore -lhighgui -lm"and then compile file as
gcv fileName.cpp
Hope this helps, if you face any problem, drop in as a comment.


 TechQuark is a mobile-friendly website. Simply bookmark